 in 3D Printing")
SLA is short for Stereolithography which is a 3D printing technology that uses a laser to cure photopolymer resin very accurately to enable a designer to create a complex model with full details.
Just like a typical 3D printing process, SLA begins with a 3D model –a digital representation of what your object is supposed to look when it’s printed. Hausarbeit schreiben lassen uses 3d modeling for your thesis project. With 3D models you can show future houses and buildings.
SLA models are created using computer-aided design (CAD) software before you export it as an STL or OBJ file to be 3D pritned.
To get a good print, you have to design your model well and follow these couple of steps.
Although there aren’t standard guides for SLA printing, these outlines will help you get the best results.
SLA 3D Printing Design Guidelines
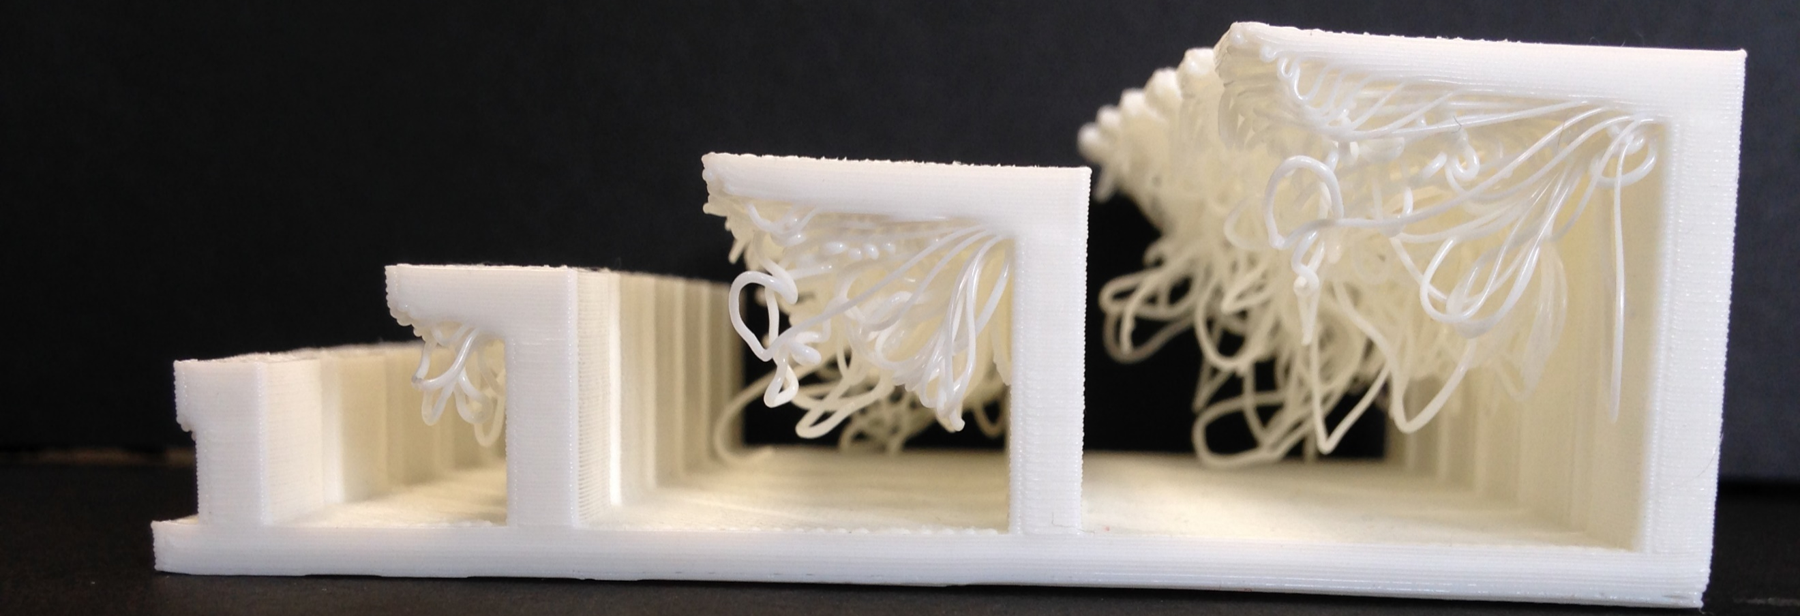
1. Hollowing
Hollowing is a common practice in SLA printing as it reduces the amount of material you need and thus reduces the cost and the time.
A drawback is that some uncured resin might get trapped inside your final print if you don’t deal with it.
How to deal with this?
This is a pretty simple task. All you have to do is drill drainage holes into your model.
These holes should be placed at the lowest point of your model to act as an outlet for excess resin.
The optimum diameter for a drain hole is around 3.5 millimeters.
2. Walls
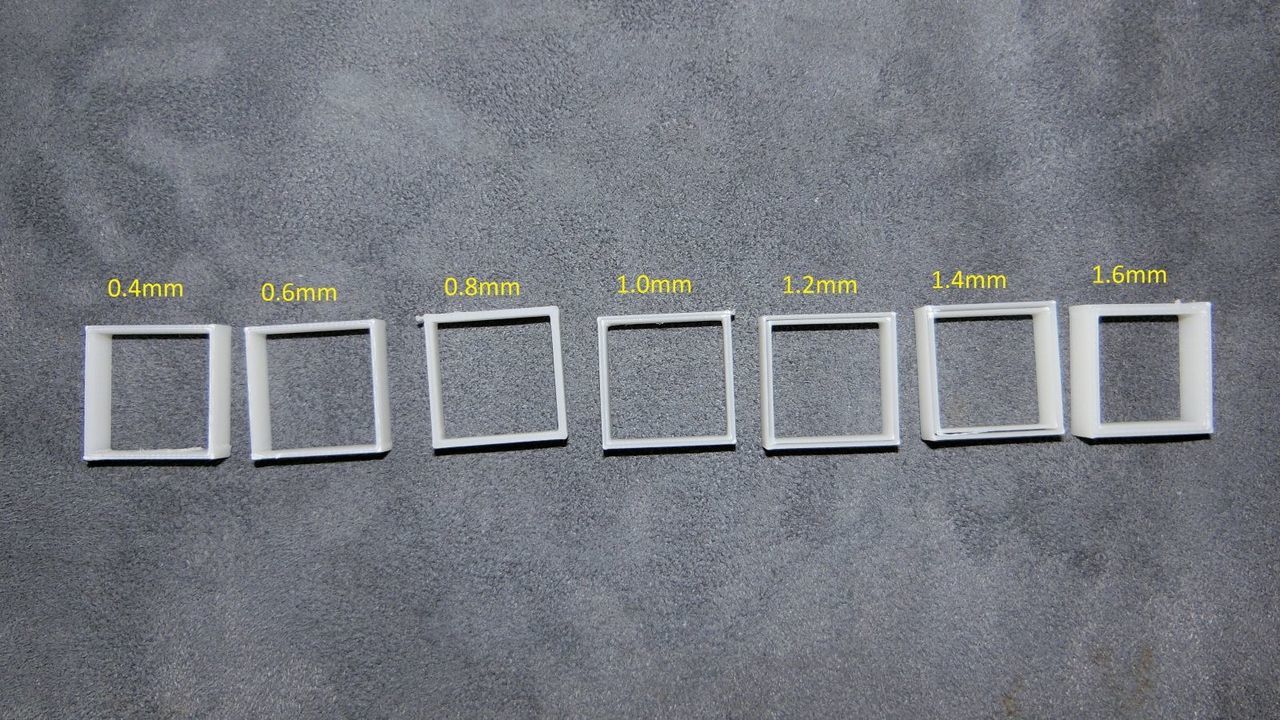
The walls are basically challenges, but you can easily deal with them during the design stage.
Logically, thicker walls will require more resin which increases the cost of printing.
Furthermore, if you’re creating non-uniform walls, the thinner parts would shrink less and faster than the thicker parts.
This invariably leads to cracking and warping. Unsupported walls would do the same thing as well.
How to deal with this?
Keep your walls as thin as possible. This helps reduce the weight of your object as well as the cost as you would be using less resin.
This is especially true for bottom-up SLA 3D printing as your printed part hangs upside down, which allows the gravitational force to have a toll on it.
However, you shouldn’t make the walls too thin that they’re fragile and prone to warping or cracking.
If you’re working with an unsupported wall, the rules may change a little as these walls are connected on less than sides.
You should use at least 0.6-millimeter thickness with these walls and filleted bases to minimize stress concentrations along the joint.
You should also keep your walls as uniform as possible.
3. Overhangs
In SLA, if your model doesn’t have enough support, overhangs may be a great risk.
It’s actually impossible to print overhangs sometimes if your model doesn’t have enough supporting structures.
How to deal with this?
Always provide the overhangs of less than 19 degrees from the horizontal with enough support.
After each time your cured resin is detached from the resin tank, a peeling process takes place. This is the result of the build platform moving away from the light source between layers. العاب بوكر للكبار
You should also provide overhangs longer than 1 millimeter with support.
Any overhang that’s longer than 1mm without support is likely to deform. And the deformity is directly proportional with the length. bukméker tippek
4. Corners
If your corners are too sharp, the stress concentration may lead to cracks in the print or an altogether failed print.
How to deal with this?
Round your corners.
In 2D terms, replace a corner with a quarter of a circle.
The recommended internal radius of a corner between two walls should be 0. العاب على النت 5 times the thickness of the wall.
On the other hand, an external radius should be 1.5 times the thickness.
5. Small holes
When you’re printing holes that are less than 0.635 millimeters in diameter, there’s a risk that they might close off when you print the model.
How to deal with this?
Stick to the minimum diameter.
A minimum hole diameter of 0.5 millimeters is recommended.
Make the holes manually.
You can add these little holes to your model after you’ve 3D printed it.
6. Internal threads
SLA printed parts may be a bit fragile and have resolution tolerances. That’s why SLA printed threads have almost no pull-out strength, and if you use any force on them, they’ll give in. شرح 1xbet tippmix nyeremenyjatek
How to deal with this?
Replace internal threads with threaded inserts.
7. Clearance
The clearance is the distance between 2 moving surfaces such as gears. When you’re printing interlocking parts, you might end up with either too much space or too little space between them.
If you underestimate or overestimate the clearance, the printed model might not work or move as expected.
How to deal with this?
Use accurate calculations to avoid over or underestimation.
The minimum clearance should be 0.5 millimeters between any 2 moving parts. Anything less than that, the parts may fuse.
8. Print orientation
When you’re thinking about the orientation of your print, the Z-axis cross-sectional area should be your main focus.
The print is more likely to stick well if the cross-sectional area is larger.
The forces responsible for the sticking are directly proportional to the size of the 2D cross-sectional area.
How to deal with this?
Keep the cross-sectional area along the Z-axis to the minimal.
If you want to reduce the Z-axis cross-sectional area, you should orient your print at an angle. However, this might increase the support structures that you’ll need.
9. Print volume
Generally, SLA printers have smaller build volume than FDM printers.
This certainly limits the average size of a print that you can make with SLA.
How to deal with this?
Stick to smaller designs.
If the size of your printed model isn’t crucial, try scaling the model down. gaminátor játékok letöltése
You can also split parts.
Another alternative is to design parts small enough to be printed with SLA. Then, you can take these parts and assemble them together as one big object later on.
Read More: